A picture might be worth a thousand words, but is it worth 10 seconds of download time? Ask yourself this question before adding a picture to your Microsoft FrontPage-based web. Web graphics today are almost entirely either .jpg or .gif files. Your choice of file type will greatly influence the size of the graphic. Read Choosing a File Format for Web Graphics for more specific information on graphics file types.
Keep the Graphic File Small
The simplest way to reduce the size of a graphics file is to keep the graphic itself small.
You can reduce the size of a graphic by cropping it in FrontPage - moving the top, sides, or bottom of the graphic to remove parts that are not necessary.
- On the Normal tab in Page view in FrontPage 2000 (Normal tab in FrontPage Editor in FrontPage 98), select the graphic.
- On the Pictures toolbar in FrontPage 2000 (Image toolbar in FrontPage Editor in FrontPage 98), click Crop.
- Drag the handles until the graphic shows only what you want.
- On the File menu, click Save.
- On the Normal tab in Page view in FrontPage 2000 (Normal tab in FrontPage Editor in FrontPage 98), select the graphic.
- Drag one of the corner handles inward to make the graphic smaller.
- On the Pictures toolbar in FrontPage 2000 (Image toolbar in FrontPage Editor in FrontPage 98), click Resample to reduce the size of the file. Do not omit this step or the file size will not change.
- On the File menu, click Save.
Reduce the Size of .jpg Files
The JPEG file format works best with large numbers of colors in graphics that are photographic in quality. You can compress .jpg files significantly without a noticeable degradation in quality. However, compression of JPEG images is "lossy." This means that some data in the image is lost during compression, so that image quality degrades at high compression levels.
The following figures show an uncompressed original photograph, taken from Microsoft PhotoDraw content, and compressed versions of the photograph, with file size and download time at 28.8 Kbps connection speed.
Original image before compression
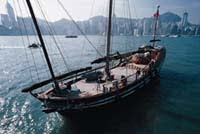
Original photo (200 x 161 pixels) 10 KB, 12 seconds
Image with 20% compression

At 20% compression 8 KB, 5 seconds Image with 70% compression

At 70% compression 6 KB, 2 seconds Image with 90% compression
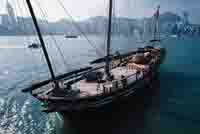
At 90% compression 3 KB, 1 second
As you can see, at 20% compression, the file is less than half the size of the original and download time is less than half. At 70% compression, there is still no noticeable degradation of the image and the download time is greatly reduced. At 90% compression, color banding is visible and although the file size is half the size at 70% compression, the download time is only 1 second less. There is no advantage to compressing the file by 90%.
The Save For Use Wizard in Microsoft PhotoDraw and the Save for Web Wizard in Microsoft Image Composer both provide live previews of an image. These previews show varying degrees of compression and download time at user-determined connection speeds. The previews can help decide if the tradeoff of faster download time for less distinct images is worth considering.
Reduce the Size of .gif Files
The GIF file format works best with graphics that contain a limited number of colors, and consist of lines or text. Files in GIF format tend to download quickly, for they usually contain 256 colors, the same number of colors that many computers display. If you convert an image from JPEG to GIF format, you will lose color information.
In the GIF format, colors are saved in horizontal rows. Areas containing solid colors compress by the greatest amount. Colors that are arranged horizontally result in smaller files and faster downloads. For example, a file containing two stripes of horizontal colors is less than half the size of a file that contains two stripes of vertical colors.
The following figures show the same graphic of a flag in both horizontal and vertical orientation.
Horizontal version of image
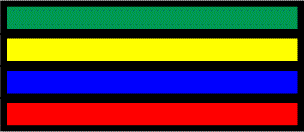
File size - 6 KB. Vertical version of image
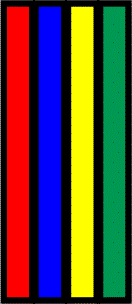
File size - 9 KB.
To rotate a graphic in Front Page:
- On the Normal tab in Page view in FrontPage 2000 (Normal tab in FrontPage Editor in FrontPage 98), select the graphic.
- On the Pictures toolbar in FrontPage 2000 (Image toolbar in FrontPage Editor in FrontPage 98), click Rotate Left, Rotate Right, Flip Horizontal (Reverse in FrontPage 98), or Flip Vertical (Flip in FrontPage 98).
When you save a graphic to a GIF format in most graphics programs, you have the option of saving the file as interlaced. Interlacing is a technique that displays a file in horizontal chunks, something like venetian blinds. The advantage of using interlacing is that an image appears quickly, although in a low resolution, and then builds to a fully resolved image. Interlaced files typically are larger than non-interlaced files.
Many graphics programs provide the option of compressing .gif files by LZW compression. Unlike the compression of .jpg files, compression of .gif files is lossless. This means that no data is lost during compression, so the image does not degrade.
Tips
When you are optimizing a graphic, please keep in mind the following tips:
- Always make a copy of your original before you do anything else.
- Never compress a file that has already been compressed. For example, if you want to compress a 100 KB image to 20 KB, you will get a cleaner result by compressing directly from 100 KB to 20 KB than by compressing first from 100 KB to 50 KB and then to 20 KB.
- If you do want to use a large graphic, consider creating a thumbnail that leads to the graphic. Use the Autothumbnail button on the Pictures toolbar in FrontPage 2000 (AutoThumbnail command on the Tools menu in FrontPage Editor in FrontPage 98) to create both the thumbnail and a hyperlink to the full-size picture.
- Use only as many colors as your audience can see. If your audience consists of people whose computers can only display 8-bit color, use no more than 256 colors.
0 comments:
Post a Comment