Sometimes HTML editors don't display HTML tags the way you created them, changing lowercase tags to uppercase or changing tags colored blue to red. When this happens, you can lose the look of the HTML page you worked so hard to create.
By default in Microsoft FrontPage, the formatting of the HTML tags in your Web pages is maintained even if FrontPage doesn't understand them. If the page was created in another HTML editor, the content, syntax, and formatting of HTML for that page are not changed, even if the page contains errors or unrecognized HTML tags.
When you save the page, FrontPage saves any custom formatting on the HTML page — such as indentation, the case of tags, and so on — for any new HTML you've written. The original HTML for the page, however, will not be modified or reformatted in any way unless you actually modify that HTML in FrontPage.
Using the new "Preserve existing HTML" option
A new option in FrontPage, Preserve existing HTML, is selected by default. This option is on the Tools menu, in the Page Options dialog box, on the HTML Source tab. It keeps FrontPage from changing existing HTML on a page. Only new HTML inserted using FrontPage, or changes to existing HTML created by FrontPage, will be changed during a save or refresh of the page.
If you want FrontPage to make changes to all HTML on the page when the page is saved or refreshed, select Reformat using the rules below on the HTML Source tab. With this option selected, FrontPage applies the formatting options listed on the tab to all HTML tags on the page.
Wednesday, September 23, 2009
Optimizing graphics for Web sites
Overview
A picture might be worth a thousand words, but is it worth 10 seconds of download time? Ask yourself this question before adding a picture to your Microsoft FrontPage-based web. Web graphics today are almost entirely either .jpg or .gif files. Your choice of file type will greatly influence the size of the graphic. Read Choosing a File Format for Web Graphics for more specific information on graphics file types.
Keep the Graphic File Small
The simplest way to reduce the size of a graphics file is to keep the graphic itself small.
You can reduce the size of a graphic by cropping it in FrontPage - moving the top, sides, or bottom of the graphic to remove parts that are not necessary.
Reduce the Size of .jpg Files
The JPEG file format works best with large numbers of colors in graphics that are photographic in quality. You can compress .jpg files significantly without a noticeable degradation in quality. However, compression of JPEG images is "lossy." This means that some data in the image is lost during compression, so that image quality degrades at high compression levels.
The following figures show an uncompressed original photograph, taken from Microsoft PhotoDraw content, and compressed versions of the photograph, with file size and download time at 28.8 Kbps connection speed.
Original image before compression
Original photo (200 x 161 pixels) 10 KB, 12 seconds
Image with 20% compression

At 20% compression 8 KB, 5 seconds Image with 70% compression

At 70% compression 6 KB, 2 seconds Image with 90% compression

At 90% compression 3 KB, 1 second
As you can see, at 20% compression, the file is less than half the size of the original and download time is less than half. At 70% compression, there is still no noticeable degradation of the image and the download time is greatly reduced. At 90% compression, color banding is visible and although the file size is half the size at 70% compression, the download time is only 1 second less. There is no advantage to compressing the file by 90%.
The Save For Use Wizard in Microsoft PhotoDraw and the Save for Web Wizard in Microsoft Image Composer both provide live previews of an image. These previews show varying degrees of compression and download time at user-determined connection speeds. The previews can help decide if the tradeoff of faster download time for less distinct images is worth considering.
Reduce the Size of .gif Files
The GIF file format works best with graphics that contain a limited number of colors, and consist of lines or text. Files in GIF format tend to download quickly, for they usually contain 256 colors, the same number of colors that many computers display. If you convert an image from JPEG to GIF format, you will lose color information.
In the GIF format, colors are saved in horizontal rows. Areas containing solid colors compress by the greatest amount. Colors that are arranged horizontally result in smaller files and faster downloads. For example, a file containing two stripes of horizontal colors is less than half the size of a file that contains two stripes of vertical colors.
The following figures show the same graphic of a flag in both horizontal and vertical orientation.
Horizontal version of image
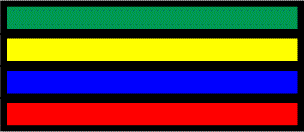
File size - 6 KB. Vertical version of image
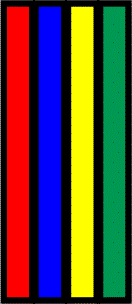
File size - 9 KB.
To rotate a graphic in Front Page:
When you save a graphic to a GIF format in most graphics programs, you have the option of saving the file as interlaced. Interlacing is a technique that displays a file in horizontal chunks, something like venetian blinds. The advantage of using interlacing is that an image appears quickly, although in a low resolution, and then builds to a fully resolved image. Interlaced files typically are larger than non-interlaced files.
Many graphics programs provide the option of compressing .gif files by LZW compression. Unlike the compression of .jpg files, compression of .gif files is lossless. This means that no data is lost during compression, so the image does not degrade.
Tips
When you are optimizing a graphic, please keep in mind the following tips:
A picture might be worth a thousand words, but is it worth 10 seconds of download time? Ask yourself this question before adding a picture to your Microsoft FrontPage-based web. Web graphics today are almost entirely either .jpg or .gif files. Your choice of file type will greatly influence the size of the graphic. Read Choosing a File Format for Web Graphics for more specific information on graphics file types.
Keep the Graphic File Small
The simplest way to reduce the size of a graphics file is to keep the graphic itself small.
You can reduce the size of a graphic by cropping it in FrontPage - moving the top, sides, or bottom of the graphic to remove parts that are not necessary.
- On the Normal tab in Page view in FrontPage 2000 (Normal tab in FrontPage Editor in FrontPage 98), select the graphic.
- On the Pictures toolbar in FrontPage 2000 (Image toolbar in FrontPage Editor in FrontPage 98), click Crop.
- Drag the handles until the graphic shows only what you want.
- On the File menu, click Save.
- On the Normal tab in Page view in FrontPage 2000 (Normal tab in FrontPage Editor in FrontPage 98), select the graphic.
- Drag one of the corner handles inward to make the graphic smaller.
- On the Pictures toolbar in FrontPage 2000 (Image toolbar in FrontPage Editor in FrontPage 98), click Resample to reduce the size of the file. Do not omit this step or the file size will not change.
- On the File menu, click Save.
Reduce the Size of .jpg Files
The JPEG file format works best with large numbers of colors in graphics that are photographic in quality. You can compress .jpg files significantly without a noticeable degradation in quality. However, compression of JPEG images is "lossy." This means that some data in the image is lost during compression, so that image quality degrades at high compression levels.
The following figures show an uncompressed original photograph, taken from Microsoft PhotoDraw content, and compressed versions of the photograph, with file size and download time at 28.8 Kbps connection speed.
Original image before compression
Original photo (200 x 161 pixels) 10 KB, 12 seconds
Image with 20% compression
At 20% compression 8 KB, 5 seconds Image with 70% compression
At 70% compression 6 KB, 2 seconds Image with 90% compression
At 90% compression 3 KB, 1 second
As you can see, at 20% compression, the file is less than half the size of the original and download time is less than half. At 70% compression, there is still no noticeable degradation of the image and the download time is greatly reduced. At 90% compression, color banding is visible and although the file size is half the size at 70% compression, the download time is only 1 second less. There is no advantage to compressing the file by 90%.
The Save For Use Wizard in Microsoft PhotoDraw and the Save for Web Wizard in Microsoft Image Composer both provide live previews of an image. These previews show varying degrees of compression and download time at user-determined connection speeds. The previews can help decide if the tradeoff of faster download time for less distinct images is worth considering.
Reduce the Size of .gif Files
The GIF file format works best with graphics that contain a limited number of colors, and consist of lines or text. Files in GIF format tend to download quickly, for they usually contain 256 colors, the same number of colors that many computers display. If you convert an image from JPEG to GIF format, you will lose color information.
In the GIF format, colors are saved in horizontal rows. Areas containing solid colors compress by the greatest amount. Colors that are arranged horizontally result in smaller files and faster downloads. For example, a file containing two stripes of horizontal colors is less than half the size of a file that contains two stripes of vertical colors.
The following figures show the same graphic of a flag in both horizontal and vertical orientation.
Horizontal version of image
File size - 6 KB. Vertical version of image
File size - 9 KB.
To rotate a graphic in Front Page:
- On the Normal tab in Page view in FrontPage 2000 (Normal tab in FrontPage Editor in FrontPage 98), select the graphic.
- On the Pictures toolbar in FrontPage 2000 (Image toolbar in FrontPage Editor in FrontPage 98), click Rotate Left, Rotate Right, Flip Horizontal (Reverse in FrontPage 98), or Flip Vertical (Flip in FrontPage 98).
When you save a graphic to a GIF format in most graphics programs, you have the option of saving the file as interlaced. Interlacing is a technique that displays a file in horizontal chunks, something like venetian blinds. The advantage of using interlacing is that an image appears quickly, although in a low resolution, and then builds to a fully resolved image. Interlaced files typically are larger than non-interlaced files.
Many graphics programs provide the option of compressing .gif files by LZW compression. Unlike the compression of .jpg files, compression of .gif files is lossless. This means that no data is lost during compression, so the image does not degrade.
Tips
When you are optimizing a graphic, please keep in mind the following tips:
- Always make a copy of your original before you do anything else.
- Never compress a file that has already been compressed. For example, if you want to compress a 100 KB image to 20 KB, you will get a cleaner result by compressing directly from 100 KB to 20 KB than by compressing first from 100 KB to 50 KB and then to 20 KB.
- If you do want to use a large graphic, consider creating a thumbnail that leads to the graphic. Use the Autothumbnail button on the Pictures toolbar in FrontPage 2000 (AutoThumbnail command on the Tools menu in FrontPage Editor in FrontPage 98) to create both the thumbnail and a hyperlink to the full-size picture.
- Use only as many colors as your audience can see. If your audience consists of people whose computers can only display 8-bit color, use no more than 256 colors.
Choosing a file format for Web graphics
Overview
Nearly all graphics on the Internet are either JPEG (Joint Photographic Experts Group) or GIF (Graphics Interchange Format) format. Other file formats, such as PNG (Portable Network Graphics) exist, but to be sure that the greatest number of browsers can display a graphic, choose either JPEG or GIF.
Using JPEG File Format
Use .jpg files for:
Use .gif files for:
Know Your Audience
Knowing who will be seeing the graphic will help you determine which file type to use. Among the questions you might ask about your audience are the following:
* Will the graphic be seen worldwide on the Internet? Be sure that all users can see the graphic clearly. This usually means using only 256 colors so that people whose computers display only 8-bit color can enjoy it. Keep in mind that .gif files use 256 colors or less.
* Will the graphic be seen on a corporate intranet? If you know that everyone in your company has a fast computer with a true-color display, you can use millions of colors. Find out what the minimum system configurations are for the computers on the intranet. Remember that .jpg files can contain millions of colors.
* Is the audience specialized? If your graphic is a diagram to be viewed by software developers or other technical audiences, determine what screen resolution they use. Many technical people work at high screen resolutions, such as 1024 x 768. Pictures might appear smaller at higher resolutions than they would at lower resolutions. Recall that .gif files generally display edges, lines, and details more clearly than .jpg files.
Consider the Total Size of Your Web Page
Although estimates vary, many Web page designers suggest that you keep the total size of a Web page from 40 KB to 60 KB for most purposes, and not more than 75 KB. Microsoft FrontPage® provides tools to help you determine both the total size of a Web page, and which pages in your Web are slowest to load. In general, .jpg files are smaller than .gif files for the same content.
If your Web page is devoted to a graphics product, or to other graphics-intensive subject matter, you can make large graphics files available and still have the page load quickly by using thumbnails. The thumbnails can be buttons that readers click to see full-size versions of graphics. FrontPage 98 and FrontPage 2000 both offer the AutoThumbnail tool to help you easily convert any graphic to a thumbnail.
Determine the Purpose of the Graphic
Determining the purpose of a graphic is the first step in choosing one. Graphics on Web sites can serve any of the following purposes:
The purpose of the graphic will help determine its size, file format, style, and appearance. Before you begin to work on a graphic, ask yourself if the graphic adds something to your site. If the answer is no, don't use the graphic.
Alternatives to Graphics
If your goal in using a graphic is to catch a reader's eye, you can sometimes accomplish the same purpose in ways that will reduce file size and download time. The following list describes some alternatives to graphics.
Nearly all graphics on the Internet are either JPEG (Joint Photographic Experts Group) or GIF (Graphics Interchange Format) format. Other file formats, such as PNG (Portable Network Graphics) exist, but to be sure that the greatest number of browsers can display a graphic, choose either JPEG or GIF.
Using JPEG File Format
Use .jpg files for:
- Photographs.
- Natural-looking images.
- A large number of colors, such as in the millions.
- A great deal of detail, such as a photograph of a house on a real estate site.
- An image with large dimensions.
Use .gif files for:
- Images that contain transparent areas.
- A limited number of colors, such as 256 or less.
- Colors in discrete areas.
- Black and white images.
- A small-size image, such as a button on a site.
- Images in which sharpness and edge clarity are important, such as line drawings or cartoons.
- Images containing text.
- Animations.
Know Your Audience
Knowing who will be seeing the graphic will help you determine which file type to use. Among the questions you might ask about your audience are the following:
* Will the graphic be seen worldwide on the Internet? Be sure that all users can see the graphic clearly. This usually means using only 256 colors so that people whose computers display only 8-bit color can enjoy it. Keep in mind that .gif files use 256 colors or less.
* Will the graphic be seen on a corporate intranet? If you know that everyone in your company has a fast computer with a true-color display, you can use millions of colors. Find out what the minimum system configurations are for the computers on the intranet. Remember that .jpg files can contain millions of colors.
* Is the audience specialized? If your graphic is a diagram to be viewed by software developers or other technical audiences, determine what screen resolution they use. Many technical people work at high screen resolutions, such as 1024 x 768. Pictures might appear smaller at higher resolutions than they would at lower resolutions. Recall that .gif files generally display edges, lines, and details more clearly than .jpg files.
Consider the Total Size of Your Web Page
Although estimates vary, many Web page designers suggest that you keep the total size of a Web page from 40 KB to 60 KB for most purposes, and not more than 75 KB. Microsoft FrontPage® provides tools to help you determine both the total size of a Web page, and which pages in your Web are slowest to load. In general, .jpg files are smaller than .gif files for the same content.
If your Web page is devoted to a graphics product, or to other graphics-intensive subject matter, you can make large graphics files available and still have the page load quickly by using thumbnails. The thumbnails can be buttons that readers click to see full-size versions of graphics. FrontPage 98 and FrontPage 2000 both offer the AutoThumbnail tool to help you easily convert any graphic to a thumbnail.
Determine the Purpose of the Graphic
Determining the purpose of a graphic is the first step in choosing one. Graphics on Web sites can serve any of the following purposes:
- Illustrative These graphics support a statement in text, literally illustrating a point. Examples of illustrative graphics are photos of houses on real estate sites, drawings on sales sites, and cartoons on comic book sites. Use .jpg files for photos and .gif files for drawings.
- Background images These graphics are often used as textures behind the text of a Web page. They can be repeating images of a company logo, swirls of color, or other abstract images. Page backgrounds often display partially transparent images. Only .gif files can display transparency.
- Navigation images These graphics can be buttons, navigation bars, or other aids to help readers move from one page on a site to another. They are typically small and self-contained. Use .gif files unless the graphic is a photo.
- Advertising These graphics are often overlaid on a Web site, frequently above the banner of a page. Advertising graphics often change from one product to another while a reader is looking at a site. Use the smallest graphic possible. Remember that the JPEG format can produce the smallest size file.
- Animation Moving pictures are magnets for the eye. A user's eye is drawn to anything that moves. Use animations to show something that would take too many words to explain, or to show transitions. As a general rule, try not to have more than one thing moving on a page at a time.
The purpose of the graphic will help determine its size, file format, style, and appearance. Before you begin to work on a graphic, ask yourself if the graphic adds something to your site. If the answer is no, don't use the graphic.
Alternatives to Graphics
If your goal in using a graphic is to catch a reader's eye, you can sometimes accomplish the same purpose in ways that will reduce file size and download time. The following list describes some alternatives to graphics.
- Consider using a solid color that will complement the color of text on the page, instead of using background images for a Web page.
- Consider using spot color in blocks in specific areas of a page to call attention to a block of text, or to group information.
- Consider using different colors in table cells to group information or highlight specific information.
Subscribe to:
Posts (Atom)